Lumen user guide
Version 0.9.2. The same guide is built into the plugin. Questions: support@tripetaudioware.com.
Lumen is a leveling amplifier: a compressor that works the way a classic optical tube leveller does. It evens out the level of a vocal, a bass or a bus smoothly, and the way it reacts to the music is part of the sound. This guide covers installing it, getting a sound in a minute, and every control.
It runs on macOS 11 or later (Apple Silicon and Intel) as an Audio Unit (AU), VST3, CLAP or a Standalone app.
Contents
- Install
- Quick start
- The front panel
- Reading the meters
- Presets
- Assist
- Recipes
- The Standalone app
- Using Lumen in your host
- Troubleshooting
- Reference
1. Install
From a download
A release is a set of zip files, one per format. Unzip the ones you want and copy them to the folder your host reads:
| Format | Copy it to | Used by |
|---|---|---|
Lumen.component (AU) | ~/Library/Audio/Plug-Ins/Components/ | Logic Pro, GarageBand, MainStage and most Mac hosts |
Lumen.vst3 (VST3) | ~/Library/Audio/Plug-Ins/VST3/ | Ableton Live, Reaper, Cubase, Studio One, Bitwig and others |
Lumen.clap (CLAP) | ~/Library/Audio/Plug-Ins/CLAP/ | Bitwig, Reaper and other CLAP hosts |
Lumen.app (Standalone) | /Applications/ | Runs on its own, no host needed |
~ is your home folder. In Finder choose Go → Go to Folder… (⇧⌘G) and paste the path. Create the CLAP folder if it isn't there. To make the plugin available to every user on the Mac, use the same folders under /Library/Audio/Plug-Ins/ instead. Then restart your host. The first time a host scans a new plugin it may take a moment.
If macOS refuses to open it ("Apple could not verify…", or the host skips the plugin), the files carry the quarantine flag macOS puts on downloads. Clear it in Terminal after copying them in:
xattr -dr com.apple.quarantine ~/Library/Audio/Plug-Ins/Components/Lumen.component
xattr -dr com.apple.quarantine ~/Library/Audio/Plug-Ins/VST3/Lumen.vst3
xattr -dr com.apple.quarantine ~/Library/Audio/Plug-Ins/CLAP/Lumen.clap
xattr -dr com.apple.quarantine /Applications/Lumen.app
Keep only one copy installed. A copy in the system-wide /Library/Audio/Plug-Ins/ is loaded instead of the one in your user folder. To remove an old one:
sudo rm -rf /Library/Audio/Plug-Ins/Components/Lumen.component /Library/Audio/Plug-Ins/VST3/Lumen.vst3Updating. Replace the files with the new version, restart your host. If Logic keeps showing the old version, quit it, then run rm -rf ~/Library/Caches/AudioUnitCache; killall -9 AudioComponentRegistrar, reopen Logic and use Settings → Plug-in Manager → Reset & Rescan Selection.
Check the AU (Logic, GarageBand, MainStage) with Apple's validator:
killall -9 AudioComponentRegistrar 2>/dev/null
auval -strict -v aufx Lumn Rosn
It should end with AU VALIDATION SUCCEEDED.
Uninstalling. Delete the files you copied. To remove the settings and the licence too, delete Lumen.settings and the Tripet Audioware folder from ~/Library/Application Support.
Activating
Lumen runs as a demo until you activate it: everything works, but every 45 seconds the output goes silent for 3 seconds, and the header shows DEMO with an Activate button.
To activate it, click Activate (or choose Licence… from the ? menu, or from Help in the Standalone app) and paste the licence key from your purchase email, the whole block from -----BEGIN Lumen LICENCE----- to -----END Lumen LICENCE-----. Then click Activate. That's it: no account, no internet connection, and every format (AU, VST3, CLAP, Standalone) is activated at once for your user account on that Mac.
The key is saved in ~/Library/Application Support/Tripet Audioware/Lumen/Licence.txt. To move Lumen to another Mac, choose Licence… → Deactivate on the old one and activate the new one with the same key. Keep the email: the key works for every 1.x version.
2. Quick start
- Put Lumen on a track (an insert), or on a bus. It works on mono and stereo tracks.
- Pick a starting point from the Preset menu at the top, for example Vocal Leveler.
- Play the part. The needle and the red ring on Peak Reduction show how much gain is being taken off. A leveler works best with a few dB of reduction on the loud parts.
- Turn Peak Reduction up for more leveling, down for less.
- Turn Gain to make the level back up. Compare with the plugin's bypass in your host, and set Gain so the processed and unprocessed signal sit at about the same loudness.
Or let Lumen do steps 2 to 5: click Assist, play the part for a few seconds, and it sets everything for what it heard. See Assist.
3. The front panel
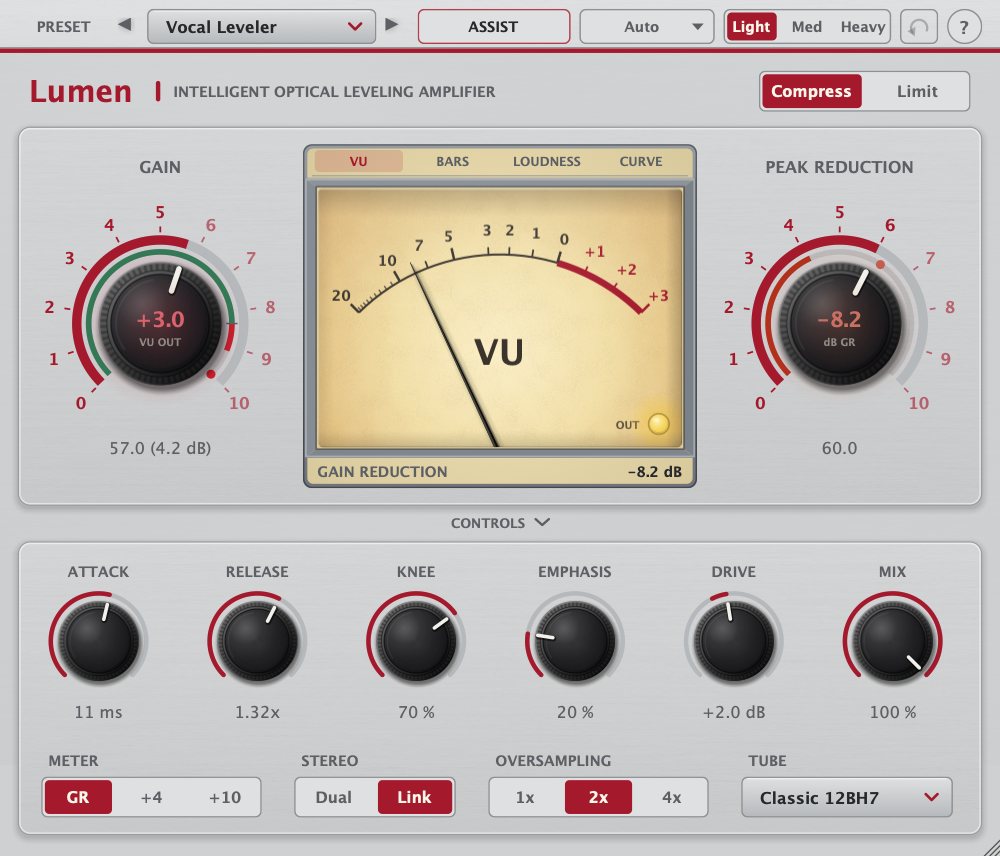
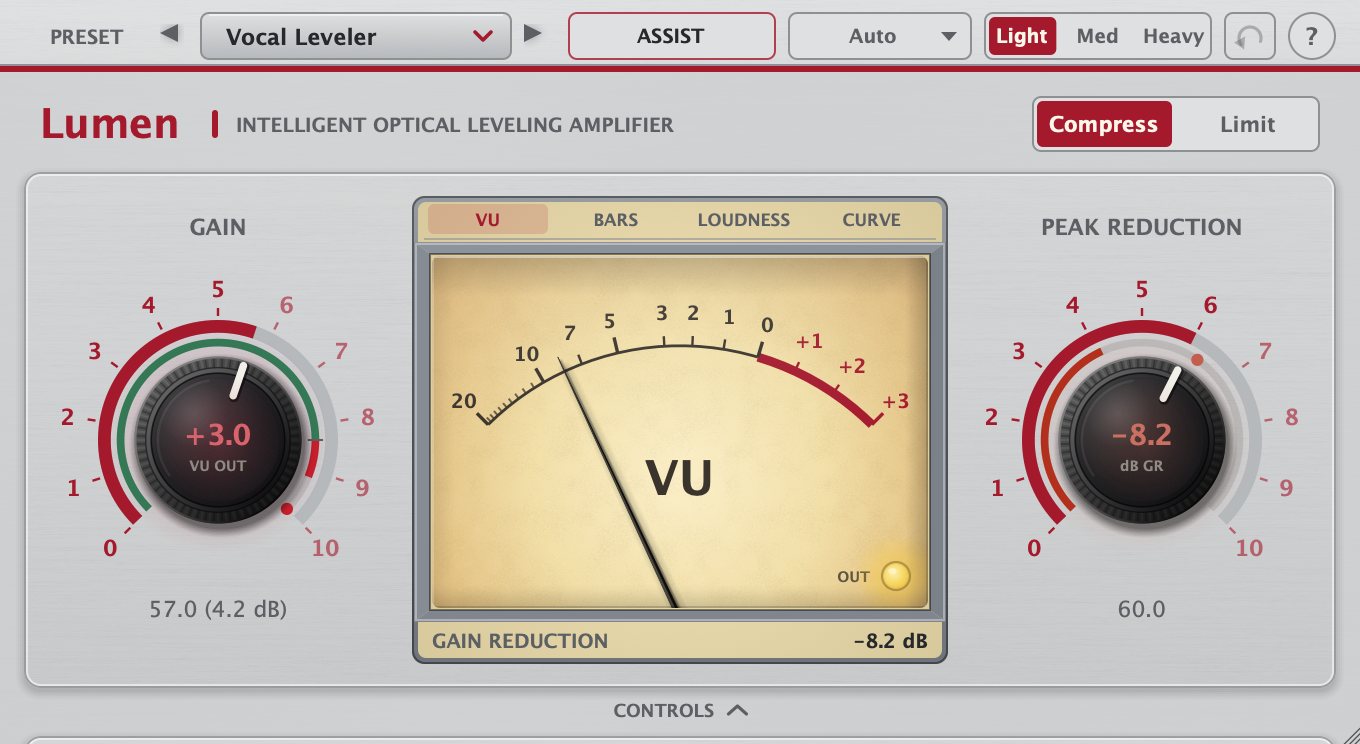
Top to bottom: the preset bar (presets, Assist and Help), the header with the Compress/Limit toggle, the two big knobs with the meter window between them, and a bottom block of cell, detector and system controls.
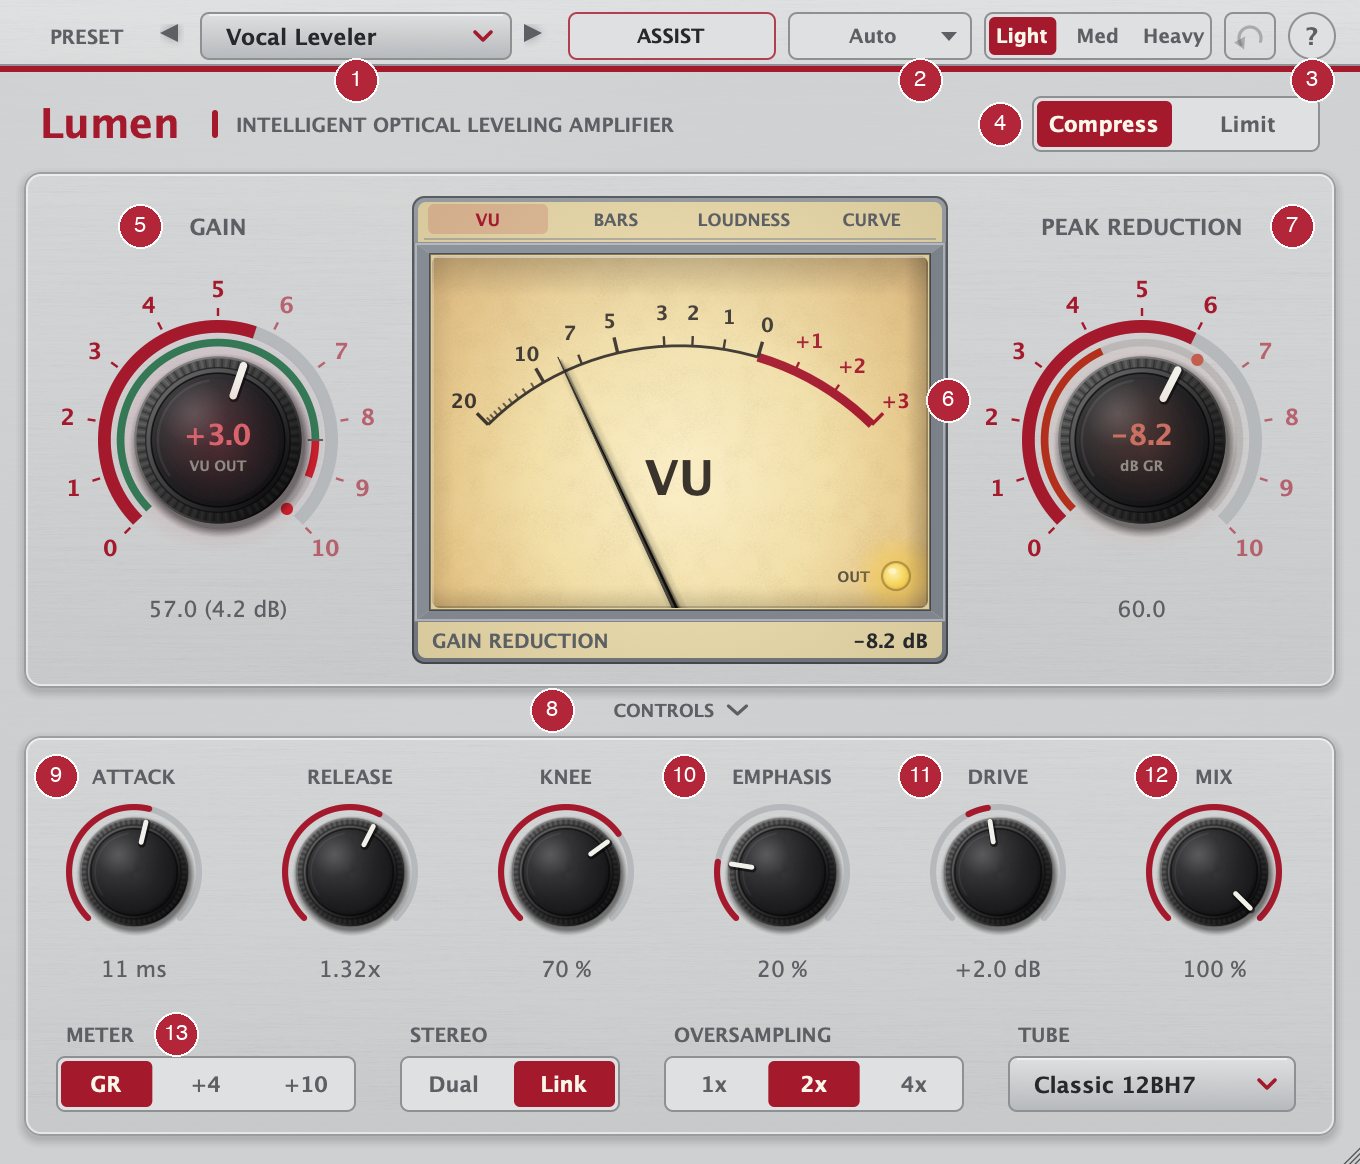
| 1 | Preset menu, with previous and next arrows |
|---|---|
| 2 | Assist: source menu, Light / Med / Heavy and Undo |
| 3 | ? Help: this documentation |
| 4 | Compress / Limit |
| 5 | Gain |
| 6 | The meter window and its four views |
| 7 | Peak Reduction |
| 8 | The CONTROLS tab, which hides or shows the bottom block |
| 9 | Cell: Attack, Release and Knee |
| 10 | Detector: Emphasis |
| 11 | Tube colour: Drive, and the Tube menu in the row below |
| 12 | Mix (dry/wet) |
| 13 | System: Meter, Stereo and Oversampling |
Getting help
Click the round ? at the right end of the preset bar to open this documentation in your web browser: the quick start, this guide, the FAQ, troubleshooting, and the licences and credits. The documentation is part of the plugin, so it works offline and always matches the version you have installed. In the Standalone app the same menu is the Help button at the top of the window, next to Options.

The big knobs
Peak Reduction sets how hard the optical cell is driven. It is the "amount of compression" control, and the one you reach for first.
- 0 does nothing. Around 50, gain reduction starts at about 0 VU (−18 dBFS) in Compress mode.
- Each step moves the point where it starts to bite by about 0.6 dB, so a hotter signal or a higher setting both mean more reduction.
- It sits before the Gain control, so turning Gain up or down never changes how much compression you get.
Gain is the output make-up gain. 50 is unity (0 dB), and the ends of the knob are ±30 dB. Each knob step is 0.6 dB. Gain comes after the detector, so it changes the level and also how hard the tube stage is driven: pushing it adds a little warmth and then saturation.
Both knobs show live information as well as where they are set:
| Inner ring | Dot | Centre | Cap | |
|---|---|---|---|---|
| Peak Reduction | Gain reduction right now (a full ring is 20 dB) | Recent peak of the reduction | GR in dB | Glows with the light in the optical cell, so it lights up just before the reduction follows |
| Gain | Output level in VU (−30 to +6, red past 0 VU) | Recent peak of the level | Output level in VU | Glows red as the output stage is driven harder |
You can double-click a knob to send it to zero, or click its readout and type a value. Attack, Release and Knee return to their centre (50), and Drive to 0 dB.
Careful: double-clicking Gain sends it to 0, which is −30 dB, and double-clicking Mix sends it to 0 % (all dry). To get Gain back to unity, set it to 50.
Compress / Limit
A two-segment switch in the header, styled like the switches in the lower controls. Click Compress or Limit to choose; the active segment is highlighted.
| Mode | Behaviour |
|---|---|
| Compress | About 3:1 with a very soft knee that spans some 15 dB. Gentle, musical leveling. |
| Limit | The cell is driven harder, giving a much steeper curve (about 10:1 and up) and about 3 dB more detector sensitivity. For catching peaks, or for deliberate squash. |
The bottom controls
The CONTROLS tab under the main panel hides or shows them. With it hidden the window is shorter, which saves screen space once you've set these and are only working with Gain, Peak Reduction and the meter. The choice is saved with your project.
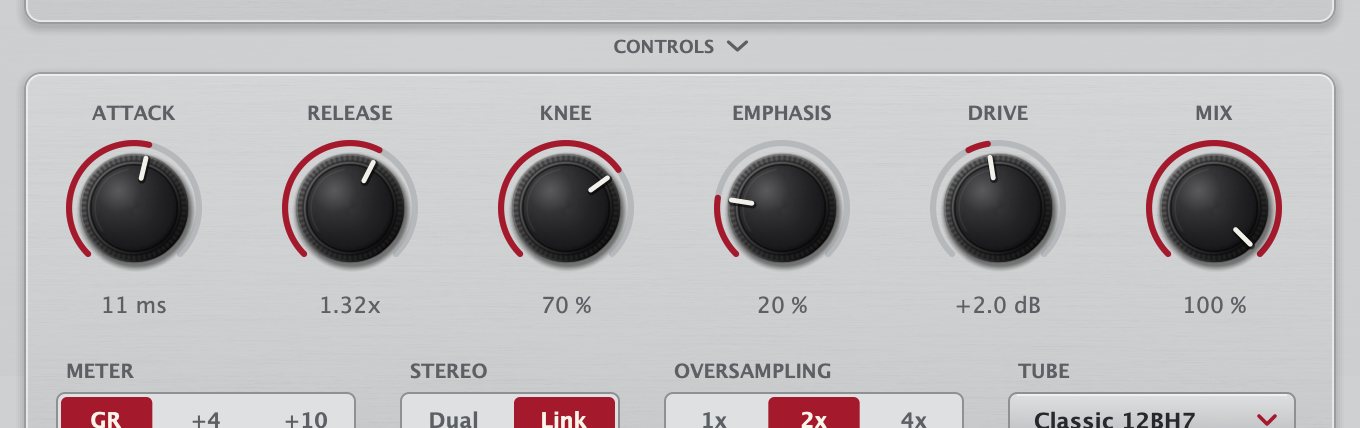
| Control | What it does |
|---|---|
| Attack | How fast the cell clamps down on a rise in level. The centre is the stock optical cell (63 % of a +10 dB step in about 8 ms; the readout says 10 ms, the cell's nominal figure). The range is 4× faster (about 2.5 ms) to 4× slower (40 ms). Slower lets transients and the cycles of low notes through. |
| Release | Scales every release time of the cell: the fast part, the slow part and the programme-dependent memory. The shape (quick first half, longer tail after long compression) is kept; only the speed changes. 1.00× is stock. Lower recovers sooner and follows the material more closely; higher is smoother and slower, and at the top of the range the cell can take many seconds to let go. A slower release also averages the detector longer, so it applies somewhat more reduction on short bursts. |
| Knee (0–100 %) | How gradually the gain reduction sets in. Low is a hard knee that switches on at the threshold, 50 is the stock soft knee, high is softer still and lets quiet passages alone longer. The knee pivots about 6 dB over the threshold, so turning it changes the shape of the onset and not where the compression is working at normal levels. |
| Emphasis (0–100 %) | Lifts the high frequencies in the detector only, up to +12 dB, so the cell reacts more to sibilance and bright transients. The sound itself isn't brightened. Use it as a de-esser: the harder the esses push the cell, the more they are turned down. |
| Mix (0–100 %) | Blends the processed signal with the dry one, for parallel compression. The dry path is delayed to match, so there is no phasing. |
| Drive (−12 to +18 dB) | How hard the tube stage is pushed. The level goes up into the tube and comes back down after it, so Drive changes how much tube colour you hear, not how loud it is. 0 dB is the stock sound; turn it up to hear the Tube voicing more, down to clean it up. Very high settings shave a little off loud peaks, as a saturating tube does. |
| Meter | What the needle shows in the VU view: GR is gain reduction, +4 and +10 are the output level. The meter range also sets where 0 VU is drawn in the other views. |
| Stereo | Link drives one cell from the louder of the two channels, so the stereo image stays steady. Dual gives each channel its own cell, which keeps more movement in the width and suits things like room mics. |
| Oversampling | 1×, 2× or 4× for the tube and transformer stages, which reduces aliasing when you drive them hard. Higher settings use more CPU and add a few samples of latency, which the plugin reports to the host. 2× is the default. |
| Tube | The character of the output tube stage. Each one has the same level for quiet signals, so switching changes the colour and not the volume. See the tube voicings below. |
The tube voicings
| Tube | Sound | Distortion at 0 VU |
|---|---|---|
| Classic 12BH7 | The stock Lumen: a touch of second harmonic, rounding off smoothly well above 0 dBFS. The default. | 0.25 %, 2nd harmonic |
| Clean 6922 | A low-distortion, high-headroom tube. Levelling with as little colour as possible, also when pushed. | 0.06 % |
| Warm 12AX7 | A hotter-biased high-gain triode: about 3.5 times the second harmonic, and a rounder ceiling that comes in earlier. Thicker and fatter; good on bass, vocals and anything thin. | 0.9 %, 2nd harmonic |
| Push-Pull 6L6 | A balanced pair of tubes: the even harmonics cancel and the third takes over. Denser and firmer, and it squares off peaks when pushed. Good on drums and guitars. | 0.2 %, 3rd harmonic |
| Pentode EF86 | Second and third harmonics together, with a harder knee at the top. More edge and bite when driven. | 0.45 %, 2nd and 3rd |
The differences are subtle at 0 VU and grow quickly as you push. Use Drive to hear them without changing the level: +6 to +12 dB makes each voicing obvious. Distortion figures for every voicing are in the reference.
The preset bar also has the Assist button, the source menu (Auto / Vocal / Drums / Instrument / Mix), Light / Med / Heavy and an Undo arrow (see Assist). The header line under the name shows the result of the last Assist run.
The Standalone app also has an Input selector in the bottom controls block (next to Meter, Stereo and Oversampling), see the Standalone app.
Window size
Drag the bottom-right corner to resize the window, from half size to three times. The layout scales as a whole and keeps its proportions.
Hover for help
Hold the pointer over a control for a moment for a one-line description.
4. Reading the meters
The meter window has four views. Click the tabs along its top. Lumen remembers your choice with the session.
| View | Shows | Use it to |
|---|---|---|
| VU | A VU needle: gain reduction or output level, depending on the Meter switch. The dial sits behind glass. The OUT LED in the lower right corner follows the output being processed: dark when it is too quiet, green in the sweet spot, yellow when hot (above about +1 VU, or peaks within 3 dB of full scale) and red when it clips (it stays red for a moment so you can see it). | Read the reduction at a glance, like the hardware. |
| Bars | Input, gain reduction and output side by side: VU level (solid), sample peak (lighter) and a peak hold. Levels are in dBFS, with a mark at 0 VU. | See how much louder the peaks are than the average, and the true peak level going to the next plugin. |
| Loudness | The last 8 seconds, scrolling: input level (grey), output level (green) and gain reduction hanging from the top (red). Under the chart, the loudness of the input and the output, K-weighted as in ITU-R BS.1770 / EBU R128: momentary (last 400 ms), short-term (last 3 s) integrated (the whole pass, gated), LRA (loudness range: how much the loudness moves, EBU Tech 3342) and true peak (the highest peak including the ones between samples, in dBTP), and what the plugin changed (Δ LU; a smaller LRA means it evened the level out). The dark line on the chart is the output's short-term loudness. Tick Target (top left of the table) to measure against your own target; unticked (the default) it only measures. (Lumen is a leveller, not a mastering tool, so it has no broadcast or streaming delivery presets.) With Target on, click its numbers at the right of the table's title and a small editor opens with two sliders, Target (integrated loudness, −40 to −5 LUFS) and True pk (the ceiling, −9 to 0 dBTP), in 0.5 dB steps (drag, or click the value and type it; double-click a slider to put it back); the TGT row counts ±1 LU around it as on target. Click the numbers again to change them later. The chart then shows the target as a green band and the true-peak ceiling as a dashed dark line labelled in dBTP (the chart traces are sample peaks, so keep them a little under it), and the TGT row shows how far the output is from it, green within ±1 LU and red outside, and the true-peak margin (green at or under the ceiling). The choice, and the Custom numbers, are saved with the session. | Watch the release. After a short burst the reduction lets go in a fraction of a second, and after a long loud passage it takes seconds. For delivery, play the whole programme and read the integrated value and true peak against your target: click Reset (top right of the loudness table) before a new pass; integrated, LRA and true peak also start again when playback is prepared again. |
| Curve | Input level against input minus gain reduction, with a fading 3-second trail. The red curve is the transfer curve of your current Peak Reduction, Mode and Knee; the dashed line is "no compression". | See the knee and the ratio. Turn Knee and the bend rounds or sharpens; Limit is much steeper than Compress. The dots trace the curve as the level moves. |
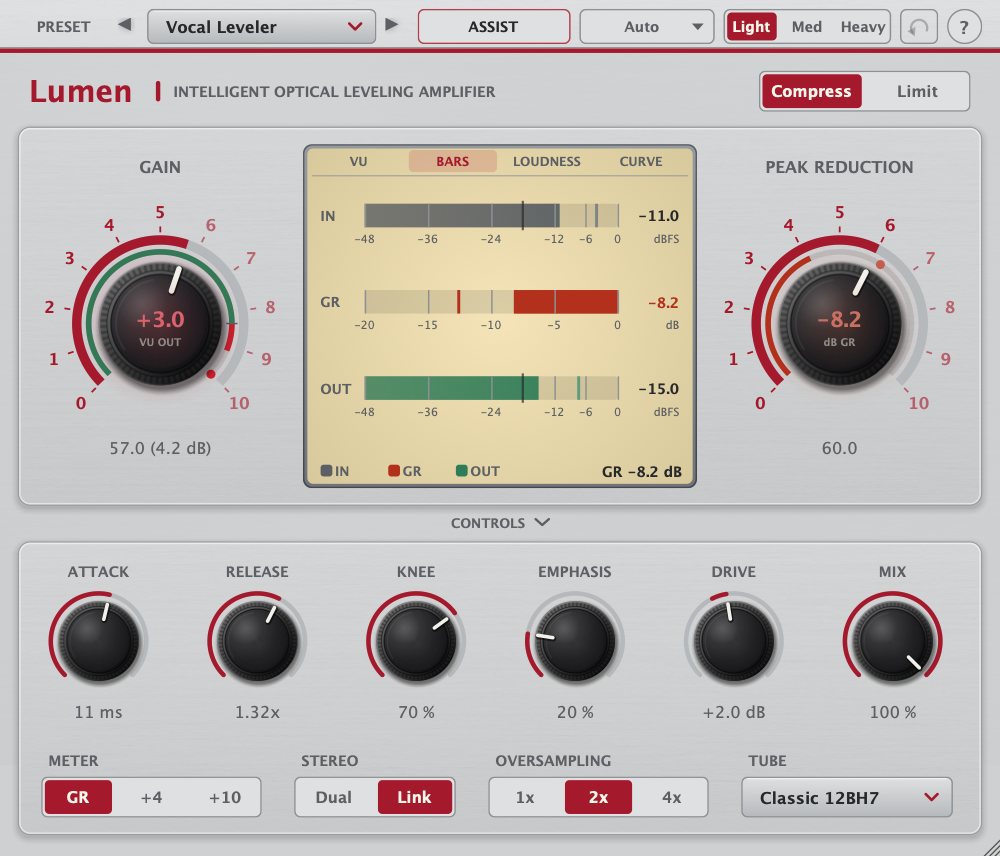
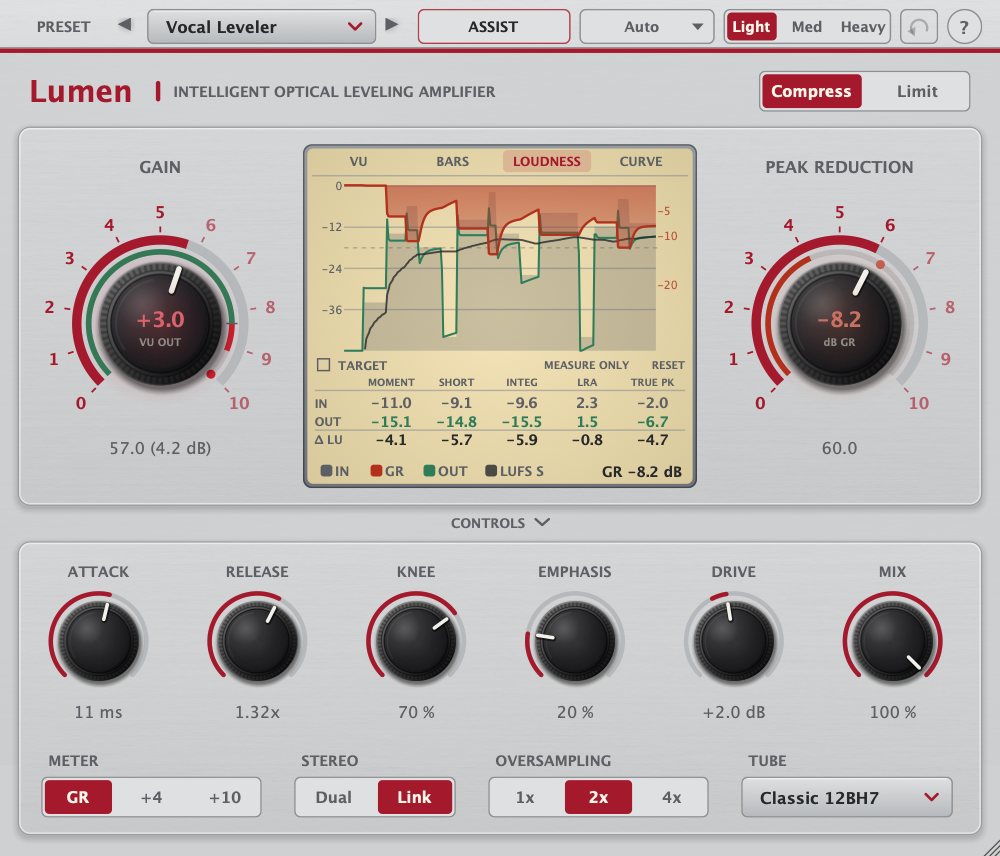
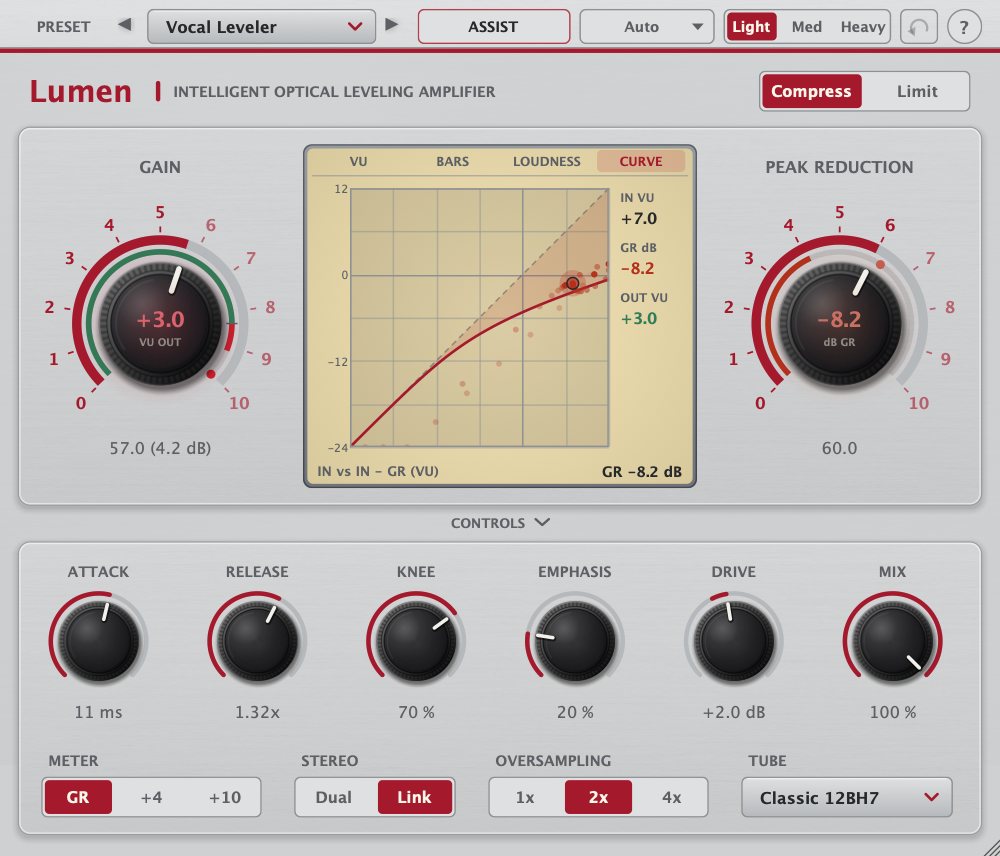
Levels. Lumen follows the studio convention: −18 dBFS = +4 dBu = 0 VU. In the +10 meter mode, 0 VU is −8 dBFS.
5. Presets
Presets are starting points. A preset sets Peak Reduction, Gain, Mode, Emphasis, Mix, Stereo, the cell's Attack, Release and Knee, and the colour (Tube and Drive), so each one is a complete sound: a slow, soft cell for the mix bus, a fast, hard one for peak catching, a warm tube on bass, a driven push-pull on the drum smash. It leaves Oversampling and the Meter as you had them, because those are about your system, not the sound of the preset. Changing any of the controls it sets afterwards marks the preset as changed (an asterisk).
Choose one from the preset menu, with the arrows next to it, or from your host's own preset menu (AU presets in Logic, the program list in VST3 hosts). An asterisk after the name means you have changed a control since loading. Choose the preset again to go back.
Each preset's Gain is set so that a 0 VU tone comes out at about the level it went in, so the preset doesn't change the loudness by itself. The "GR" column is the gain reduction a tone at 0 VU gets. Louder material gets more.
Attack, Release and Knee are knob positions (50 = the stock cell; higher Attack and Release are slower, higher Knee is softer).
| Preset | Peak Reduction | Gain | Mode | Other | Attack / Release / Knee | Tube, Drive | GR @ 0 VU | Use |
|---|---|---|---|---|---|---|---|---|
| Init | 40 | 50 | Compress | 50 / 50 / 50 | Classic, 0 dB | ~0 dB | The default state. | |
| Vocal Leveler | 60 | 57 | Compress | Emphasis 20 % | 55 / 60 / 70 | Classic, +2 dB | 4 dB | Classic smooth vocal riding. |
| Vocal Upfront | 70 | 62 | Compress | 40 / 45 / 45 | Classic, +4 dB | 7 dB | Dense, forward vocal that sits on top of a mix. | |
| Sibilance Tamer | 48 | 53 | Compress | Emphasis 100 % | 25 / 30 / 40 | Clean, 0 dB | 2 dB | Gentle leveling that reacts most to esses and bright peaks. |
| Bass Even | 63 | 58 | Compress | 70 / 60 / 60 | Warm, +3 dB | 5 dB | Evens out bass DI and synth bass note to note. | |
| Acoustic Guitar | 57 | 56 | Compress | Emphasis 40 % | 60 / 55 / 70 | Clean, +1 dB | 3.3 dB | Smooth strumming without pick spikes. |
| Drum Bus Glue | 53 | 54 | Compress | 75 / 40 / 70 | Classic, +2 dB | 2 dB | Light glue on a drum bus. | |
| Parallel Drum Smash | 80 | 74 | Limit | Mix 40 % | 25 / 30 / 25 | Push-Pull, +6 dB | 16 dB (wet) | Heavy limiting blended under the dry kit. |
| Room Mics Crush | 75 | 72 | Limit | Stereo Dual | 20 / 35 / 20 | Pentode, +6 dB | 13 dB | Squashed, breathing room mics. |
| Peak Catcher | 45 | 50 | Limit | 15 / 40 / 15 | Clean, 0 dB | 0 dB | Untouched at 0 VU, catches peaks from about −16 dBFS up. | |
| Mix Bus Gentle | 48 | 52 | Compress | 65 / 65 / 85 | Clean, 0 dB | 1 dB | A touch of leveling on the mix bus. |
6. Assist
Assist listens to your source and sets the leveler up for it.
- Optional: tell it what you are processing. The menu next to the button offers Auto, Vocal, Drums, Instrument and Mix. On Auto, Assist guesses from the sound.
- Click Assist in the preset bar.
- Play the part you want to process. The button fills as Lumen listens to about 8 seconds of it. Silence doesn't count, so you can start it before the downbeat.
- When the button is full, Lumen analyses the audio (about half a second) and sets the controls. The header shows what it found, for example
ASSIST: Vocal · 3.0 dB GR · Compress · Emph 22% · Clean +2.0 dB(the source is only named when you picked it).
You can click the button again after at least 2 seconds to analyse early, or at any time to cancel.
Assist sets Peak Reduction, Gain, Mode, Emphasis, Mix, Attack, Release, Knee, Tube and Drive. It leaves Stereo, Oversampling and the Meter alone.
- The source menu (Auto / Vocal / Drums / Instrument / Mix) tells Assist what the material is. Picking it gives the best result, because Assist then doesn't have to guess: a dark vocal or a roomy drum loop gets the vocal or drum settings, not the ones for whatever it resembles. Use Instrument for guitars, keys, strings, horns and bass (a bass is still recognised and keeps its low end in the detector), and Mix for a mix bus or any group of instruments. After a run, pick another source and the settings are re-fitted to the same audio.
- Light / Med / Heavy chooses how hard it works the source. After a run, click another intensity and the settings are re-fitted to the same audio straight away, so you can compare them without playing the part again.
- Undo (the arrow) puts back the controls from before Assist.
- The source starts on Auto and the intensity on Light; both are saved with the session.
What it does:
- Uses the source you picked, or estimates it on Auto (vocal-like, bass-like, drum-like, a full mix or another instrument) from the spectrum, the transients and the stereo image, to choose its targets. An estimate is only a guess, since Assist can't know what you are really feeding it, so the header names the source only when you picked it.
- Chooses the curve. Compress for leveling. Limit only for drums at Heavy, which become a parallel smash with Mix at 50 %.
- Sets the cell. A soft knee (firmer as the intensity goes up), a slightly slower attack and a longer release, so it eases in and lets transients through instead of grabbing them. Drums get the slowest attack (the hit comes through) and a quicker release (the gain recovers before the next hit); bass and mixes get a slower attack and a longer release. These are set before Peak Reduction is searched for, so the amount of reduction still hits the target.
- Picks the colour. A tube voicing for the source: Warm 12AX7 on bass (its second harmonic carries low notes onto small speakers), Push-Pull 6L6 on drums (odd harmonics for bite), Clean 6922 on a mix bus, and the stock Classic 12BH7 on vocals and instruments, or Clean when they are bright or sibilant, where added harmonics would turn harsh. Drive goes up with the intensity, but never so far that the loud parts hit the tube hotter than about −10 dBFS or the peaks clip it: it is meant to be heard as warmth, not as distortion. On Light, vocals, mixes and instruments keep 0 dB Drive.
- Sets the detector. It raises Emphasis for vocals and instruments with strong esses or pick noise.
- Finds Peak Reduction by running Lumen's own detector over what it heard, until the average gain reduction on the loud parts matches a target for the source and intensity:
| Material | Light | Medium | Heavy | |---|---|---|---| | Vocal | 1.5 dB | 3 dB | 5 dB | | Bass | 1.5 dB | 3 dB | 5.5 dB | | Drums | 2 dB | 4 dB | 8 dB (wet, Mix 50 %) | | Mix | 1 dB | 2 dB | 3.5 dB | | Instrument | 1.5 dB | 3 dB | 5 dB |
These are averages while the source plays; the loudest moments reduce about twice as much. They are deliberately gentle. If you want it harder, step up to Heavy or turn Peak Reduction up afterwards.
- Matches the loudness: it sets Gain so the output is as loud as the input over the loud parts (within about 0.5 dB), with the tube and Drive it picked in circuit. Bypassing then compares like with like.
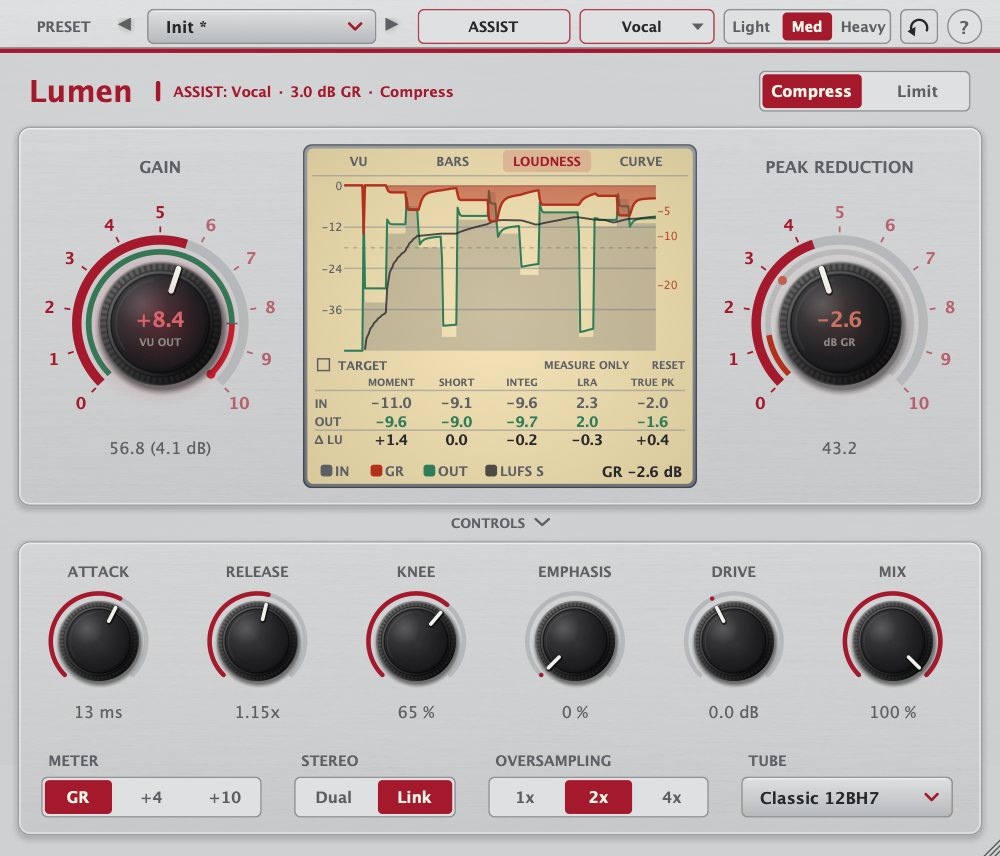
Assist is a starting point, not an oracle. Treat what it gives you as a first pass, then adjust by ear.
7. Recipes
These are starting points. Every one assumes a signal peaking around −12 to −6 dBFS.
Lead vocal, smooth. Vocal Leveler, or Assist at Med. Aim for 3 to 6 dB of reduction on the loud words, and let the Loudness view show the reduction easing off between phrases. If esses jump out, raise Emphasis. If low-end thumps (plosives, mic handling) pump the compressor, high-pass the track before Lumen.
Vocal that must sit on top. Vocal Upfront. If it gets too dense, back Peak Reduction off by 5 or lower Mix to about 70 % to let some natural dynamics through.
Bass. Bass Even. Use Link or Dual as you like; on a mono bass it makes no difference.
Drum bus. Drum Bus Glue for subtle cohesion. For a big sound, Parallel Drum Smash: the 40 % mix keeps the dry transients while the squashed copy adds weight. If the kick pumps the cymbals, lower Peak Reduction a little or compress the drums in groups.
Room mics. Room Mics Crush with Dual keeps the width moving as each side breathes on its own. Lower Peak Reduction if the room sounds too pumped.
Mix bus. Mix Bus Gentle. Keep it to 1 to 2 dB. If you hear pumping on the kick, back Peak Reduction off a little.
Catching stray peaks. Peak Catcher is inactive until a peak passes about −16 dBFS.
Making the tube work. Pick a Tube and raise Drive: the level stays where it is and the colour grows. Warm 12AX7 at +6 to +9 dB thickens a thin vocal or bass; Push-Pull 6L6 at +9 to +12 dB makes a drum bus denser and tames its peaks; Pentode EF86 adds bite to guitars and snare; Clean 6922 keeps the levelling clean even when you drive it. The old way still works too: raising Gain also drives the tube, but it changes the level. Set Oversampling to 4× if you push it hard.
A/B-ing. Use your host's bypass: Lumen stays aligned in time when bypassed, so switching doesn't click or shift.
8. The Standalone app
Lumen.app runs the plugin on its own with your audio interface, which is useful for checking the sound or for hardware processing.
The first time:
- macOS asks for microphone access. Allow it. If you refused, re-enable Lumen under System Settings → Privacy & Security → Microphone, or the input stays silent.
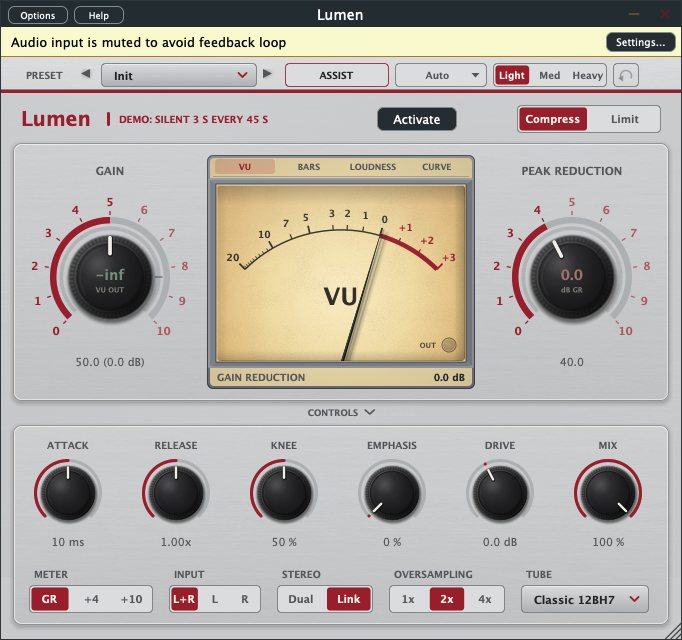
- A yellow strip across the top says Audio input is muted to avoid feedback loop. The app starts muted so that a microphone and speakers can't feed back. Click Settings….
- In Audio Settings, pick your interface as the Input and Output device, choose the sample rate and buffer size, and tick the input channels your source is on. Then turn off Mute audio input at the top.
The Help button at the top of the window, next to Options, opens this documentation, the FAQ and the licences in your browser (the Standalone window doesn't show the ? button, since Help is already in the top bar).
The Options button in the top-left of the window has:
- Audio Settings… (the dialog above: the audio device, channels, sample rate and buffer size, and the mute switch),
- Save current state… and Load a saved state… (settings as a file),
- Reset to default state.
The app has no MIDI settings, since Lumen doesn't use MIDI.
Mono sources. Input channels are offered in stereo pairs, so a single microphone on one input arrives on one side only. Use the Input selector in the bottom controls block, between Meter and Stereo (show the block with the CONTROLS tab if it is hidden; the selector only exists in the Standalone): L+R (both channels, the default), L or R to feed that channel to both sides.
Your settings, the window position and the last state are saved when you quit and restored when you reopen.
9. Using Lumen in your host
- Formats: AU (Logic, GarageBand, MainStage), VST3, CLAP. Use whichever your host prefers; they sound the same.
- Mono and stereo. The input and output layout match: mono in/mono out, or stereo in/stereo out. There is no sidechain input.
- Latency. At 1× oversampling there is none. At 2× and 4× the plugin reports a few samples to the host, which compensates it. Mix and bypass stay aligned.
- Automation. Peak Reduction, Gain, Mode, Meter, Emphasis, Mix, Oversampling, Stereo Link, Bypass, Attack, Release, Knee, Tube and Drive can all be automated.
- Sessions. Everything, including the selected preset, the meter view, whether the bottom row is shown and the Assist source and intensity, is saved with your project. A project saved by an older version loads new controls at their defaults, which sound the same as before.
- Presets in the host. The preset list appears in your host's own preset menu (AU factory presets in Logic).
10. Troubleshooting
The plugin doesn't show up in my host. Check that it's in ~/Library/Audio/Plug-Ins/ (Components for AU, VST3, CLAP) and restart the host. For Logic, run the cache reset in Install. For a downloaded build, clear the quarantine flag.
Logic shows an old version. An older copy is installed system-wide in /Library/Audio/Plug-Ins/. Remove it (see Install) and rescan.
auval fails. Copy the output and send it to whoever maintains the build. Make sure only one copy is installed.
Nothing happens when I turn Peak Reduction up. It reacts to level. Check the Bars view: if the input is far below 0 VU (−18 dBFS), you need a higher setting, or more input level. At 0 nothing is processed. Also check that the plugin isn't bypassed in your host and that Mix isn't at 0 %.
The level changes a lot when I bypass. Set Gain for equal loudness, or run Assist, which does it for you.
It pumps on the kick or bass. Lower Peak Reduction until the pumping stops, or high-pass the track before Lumen. Switch to Dual only if you want the sides to move independently.
It's too bright or too dull. Emphasis only changes what the detector hears. If the tone itself has changed, check the Gain and Oversampling settings first, then your signal. The tube and transformer stages add a slight roll-off (about 0.5 dB at 20 kHz).
The Standalone is silent. The input is muted until you turn off Mute audio input in Options → Audio Settings…. If it still is, check the microphone permission and that the right input channels are ticked.
The Standalone feeds back. Use headphones, or keep the input muted. With a microphone and speakers in the same room, feedback is expected.
CPU use is high. Set Oversampling to 1× or 2×.
11. Reference
Parameters
| Parameter | Range | Default | Notes |
|---|---|---|---|
| Peak Reduction | 0–100 | 40 | Threshold roughly 12 − 0.6 × knob dBFS; the bottom 5 % fades out the detector. |
| Gain | 0–100 | 50 | (knob − 50) × 0.6 dB: −30 to +30 dB. |
| Mode | Compress / Limit | Compress | |
| Meter | GR / +4 / +10 | GR | UI only; does not change the sound. |
| Emphasis | 0–100 % | 0 % | 0.12 dB per %, 0 to +12 dB in the detector. |
| Mix | 0–100 % | 100 % | |
| Oversampling | 1× / 2× / 4× | 2× | |
| Stereo Link | Dual / Link | Link | |
| Bypass | off / on | off | The host's bypass uses this too. |
| Attack | 0–100 | 50 | 50 is the stock cell. Scales the attack time ¼× to 4× (two octaves each way). |
| Release | 0–100 | 50 | 50 is the stock cell. Scales every release time ¼× to 4×. |
| Knee | 0–100 % | 50 % | 50 % is the stock knee. Low is hard, high is soft; the threshold stays put. |
| Tube | Classic 12BH7 / Clean 6922 / Warm 12AX7 / Push-Pull 6L6 / Pentode EF86 | Classic 12BH7 | Same small-signal level for every voicing. |
| Drive | −12 to +18 dB | 0 dB | Into the tube, compensated after it. |
| Input | L+R / L / R | L+R | Standalone only. Not automatable. |
Measured behaviour
Measured at 48 kHz on a 1 kHz tone.
| Static curve (Compress) | Soft knee over about 15 dB, approaching 3:1 |
|---|---|
| Static curve (Limit) | Much steeper (about 10:1 and up) |
| Attack | 63 % of a +10 dB step in 5–13 ms (faster for bigger jumps, like the real cell) |
| Release after a 0.1 s burst | 50 % in about 0.08 s, fully recovered in about 1.5 s |
| Release after a 5 s burst | 50 % in about 0.9 s, fully recovered in about 4 s |
| Distortion | About 0.25 % THD at 0 VU, mostly 2nd harmonic (Classic tube, Drive 0 dB) |
| Tubes at 0 VU | Classic 0.25 %, Clean 0.06 %, Warm 0.88 % (2nd), Push-Pull 0.21 % (3rd), Pentode 0.45 % (2nd and 3rd) |
| Tubes at 0 VU, Drive +12 dB | Classic 1.1 %, Clean 0.3 %, Warm 3.4 %, Push-Pull 3.3 %, Pentode 2.2 % |
How the release works
The reaction to loud and quiet passages is the point of an optical leveler. After a short peak, about half of the reduction lets go in 60 to 80 ms. After a long, heavy passage, a slower component takes over and the recovery stretches to several seconds. That is why it sounds smooth on vocals: short peaks bounce back, while sustained loud sections stay leveled.